This is a summarized version of my original article published on Process Point Technology’s blog.
In the world of AI solutions for process industries, creating custom models for specialized client problems often requires extensive datasets with detailed annotations. However, manual annotation is resource-intensive, and data confidentiality concerns often prevent the use of public annotation tools. This is where Vision Language Models (VLMs) come in as a promising solution.
Our Approach
We explored whether VLMs could effectively analyze and annotate specialized industrial imagery using natural language prompts, focusing on Personal Protective Equipment (PPE) analysis. Our investigation involved two distinct phases:
Phase 1: OllaMa-based Implementation
Utilized LLaVa-13B and LLaMa3.2-Vision models
Focused on rapid prototyping and quick experimentation
Demonstrated strong performance in simple annotation tasks
Processing time: 15-20 minutes for 185 images
Phase 2: Transformers-based Implementation
Employed Ovis1.6-Gemma2-9B and Qwen2-VL-9B models
Offered higher accuracy but slower processing
Better suited for complex annotation scenarios
Processing time: 900-1200 minutes for 185 images
Key Findings
Our experimental evaluation revealed several important insights:
All models performed best with simple images at high detection accuracy
Performance decreased notably with complex images
LLaVa 13B showed superior performance with simple image detection
OVIS-VL handled moderate complexity better than other models
Practical Implications
The study demonstrated that VLMs can significantly reduce manual annotation effort, though model selection should consider specific use case requirements. A hybrid approach combining VLM capabilities with human verification may be optimal for industrial applications.
This is a summary of my detailed technical analysis originally published here. The original article includes complete experimental details, code implementations, and detailed performance metrics.
Windows Subsystem for Linux Installation Guide for Windows 10 (Link). Follow the manual Installation steps (Link)
Download Docker for desktop (Link). Make sure that docker is running “Windows Docker Engine” (as we are working in VM). To do so right click on the docker icon in “hidden icons” in taskbar and click on “Switch to Windows Container…”
Step 2: Create Docker File in Visual Studio Code
Install Visual Studio Code. Install Docker plugin; Install Azure tools plugin; Install python plugin. Open your folder where you have created your project folder in Visual Studio Code and perform the following tasks:
Install Azure-CLI for the system (Link). Once Installed, check by running following command for Login into azure account.
az login
(OPTIONAL) If you have multiple subscriptions, then set the Subscription on which you are working by using following command (link)
az account set --subscription "<subscription-id>"
To verify you can work with the Container registry and push a docker image; login to the Azure Container Registry (ACR) using following command
az acr login -n <Azure-Container-Registry-Name>
Create your Docker file for the project. Use the following code as templet to build your own docker file. Save your docker file in same project folder with no extension and name should be “Dockerfile”
FROM ubuntu
LABEL maintainer="Organization Name"
LABEL developer="Shreyans Jain"
RUN apt update
RUN apt --assume-yes install python3 python3-pip
RUN python3 -m pip install --no-cache dir pandas==1.0.3 numpy==1.19.4
RUN python3 -m pip install --no-cache-dir scikit-learn==0.22.2.post1 xlrd==1.2.0 xgboost==1.0.2
RUN python3 -m pip install --no-cache-dir flask==1.1.1 flask-cors==3.0.8 flask-restful==0.3.8
RUN mkdir -p /<new_folder>
COPY <my_project_folder> /<new_folder>  # <my_project_folder> is my project folder
WORKDIR /<new_folder>
ENTRYPOINT [ "python3" ]
CMD [ "app.py" ]
Now we will build the docker file directly into ACR. To build your docker file run the following command: (Link)
az acr build --registry <ACR_Name> --image <New_Image_Name>
Wait until the build is successful. To verify the build and to check whether your new docker image is created in your ACR, run the following command:
az acr repository list --name <ACR_Name> --output table
Step 3: Connect ACR with AKS
To attach ACR with AKS use the following command: (Link)
az aks update -n <AKS_Name> -g <Resource_Group_Name> --attach-acr <acr_name>
Step 4: Create YAML for deployment
Create a YAML File (refer previous yml files). Save the file on same level as Dockerfile, with extension as “.yml”
Note: To learn how to write a YAML file, you can refer this link.
Step 5: Deploy your container to the AKS
Ensure you are working on correct AKS
az aks get-credentials -g <Resource_Group_Name> -n <AKS_Name>
Push your “.yml” file on AKS using following command:
kubectl apply -f <.yml file>
Check your deployment by running following command:
kubectl get pods --watch
To Manage AKS Clusters use this Link. Use this link for steps to start and stop the AKS Cluster. It is used when a update is made to clusters.
(OPTIONAL) To add a new nodepool to your AKS, follow the following templet: (link)
az aks nodepool add \
    --resource-group <Resource_Group_Name> \
    --cluster-name <AKS_Name> \
    --name <nodepool_name>\
    --mode System \
    --node-count 1 \
    --node-vm-size Standard_NCasT4_v3 \
    --max-pods 30 \
    --node-taints sku=gpu:NoSchedule \
    --no-wait
Note: –node-vm-size mentioned here is a GPU based VM. The list of VM’s available for AKS is ever expanding. To check which VM is available in your subscription location, you can run command available here
The idea behind The Future Framework is to help freshers (or anyone honestly) discover ‘hidden gem’ of fields that are highly crucial but not very well known. Knowing about such fields will help them take their first steps towards making a high-impact career in them.
This article is sponsored by Rotary Club of Mumbai Dahisar along with Rotaract Club of Dahisar Coast and Rotaract Club of Borivali Heights.
About the speaker – you Rohit Viswans Is presently, the Chief engineering and manufacturing officer at Ampere Computing. In the past, Rohit sir has been the Director of Engineering for Intel Architecture Group – India, followed by, the Director of engineering for Intel’s Atom products and subsequently the Vice President of Platform Engineering for Intel group of companies globally.
Q1 – Could you tell us about your beginning in the semiconductor sector?
Rohit completed his high schooling at King George, Dadar and then attended college at Ruparel Matunga. He was lucky enough to be in the very first electronics batch of RuparelCollege and that is really where his interest in electronics and computer engineering began. However, his first access to PCs was after Ruparel College when his father sent him overseas to the US for his undergraduate degree in computer engineering. After his undergrad, he wanted to do further studies in the same field, so he decided to take a master’sdegree in the same field. He started as an entry-level engineer at Intel right after it.
It was exciting for him to be part of a small team of fresh engineers where he could really jump in and start learning so many things from the more experienced engineers in the team. The series of preceding events got the momentum going for him to continue excelling and developing a long career in this field of a chip design and platform engineering.
Fundamentals needed to be doing well in this industry is really a good strong foundation in math and science without that you really can’t develop the deep expertise you need in designing chips and in hardware engineering and platforms.
The chip building journey involves, first, market research on what is expected of the chip followed by building and designing the chip architecture (including writing the softwarewhich enables it to perform) using multiple cutting-edge tools, then manufacturing the chip after which it is rigorously tested before it can be mass manufactured and shipped with devices.
Q2 – Where are these chips/microprocessors used? And which are some of the up and coming applications that are witnessing a significant increment in chip usage?
Literally if you look around your house in your kitchen every electronic device that you see has some sort of chip in. Whether it’s the front panel of microwave to your mixer. They are used in industrial machines too where chips collect data for preventive maintenance. You’ll also find chips in the medical field, robotics, 4G and 5G too are tied to silicon chips.
Areas of growth include autonomous driving. There are chips in the automobiles today doing basic agent control,monitoring your fuel level, or helping with the navigation system with the media for music playback and things like that. You can see almost every automobile company an investing a lot of money getting to autonomous car driving andautonomous trucks too.
Other big application includes factories – about 30-40% of the top factories have now deployed intelligent machines with chips. There are so many factories around the world that havenot really embraced such intelligent machinery.
Another big area is the concept of artificial intelligence and machine learning on how you are taking all the data that you have out there and really identify patterns through the data. The machine is going to predict what may happen in that situation. Weather reporting, weather monitoring, quick reporting and monitoring and signal early warnings are all applications.
Semiconductors are getting applied into lot of the pharmaceutical areas. A great example being the mRNA vaccines that got so quickly made is directly tied it to the foundational machine learning capabilities of those companies.
IOT (the technology that enables devices to talk to one another) too extensively use chips.
Q3 – ARM and x86 – Arm is simpler and easily tailorable, consumes lesser and now the performance has been improved. What is all the buzz about and what the significant changes taking place?
x86 came first and is used by intel and AMD. 25-30 yearsback, another company defined ARM architecture. ARM was simpler to implement, low power and so was used in mobile phones. x86 wouldn’t do well in a cell phone since it would take up too much power and you’d want the battery to last for a day at least. x86 is largely used in PCs and servers.
Extensive research and development have led to advancements in chip making with ARM technology. Hi powered arm chips can now be used within datacenters. Companies like Ampere computing are making these chips for data centers. A data center could have a thousand systems running. With an arm-based chip they might be able to run 1200 or 1500 systems while consuming the same amount of power. They can deliver 20% better performance while consuming 30% less energy. It helps the TCO (total cost of ownership goes down) for a data center go down.
Demand for chips in various areas has grown very fast and the supply side (design, production, manufacturing) hasn’t been able to keep up. One chip factory can require an investment of$5 billion and 3 years to be up and running. TSMC has announced they will invest $100 billion in expanding their capacity.
Q4 – Could you tell us about some of your learnings that you’ve had along your journey?
The willingness to ask questions. Always ask questions and do not operate within your own silo. It will help you learn faster. Always take interest in learning about new areas within your field. Further, take ownership of any work you do or any project you work on.
Failing is okay. And inevitable, if you are attempting something for the first time.
It takes years to build an expertise. People often expect to work for 12 and 18 months and be experts in their fields. It simply doesn’t work that way. You have to spend time to build that deep expertise. If you quit too soon, you’ll end up being a jack of all trades.
Find good mentors. It doesn’t matter how senior you are. You could be the vice president of a company and still have a mentor. Mentors help guide the way, bounce around ideas and weigh the pros and cons of different choices.
Be in different roles and work in different locations. Working in different countries teaches you about different work cultures and people, and helps you gain the experience to be an effective global leader.
Q5 – How do you see India’s role shaping up in this field?
Since chip manufacturing plants require heavy infrastructure and take 3-4 years for their setup, it might still be find before we can find them in India. Although the Indian government has plans around chip manufacturing too.
India is and will continue to be a source of human capital for this industry.
Spectrum of different opportunities include, tool development(tools used for making the chips), chip design, hardware design and software.
Careers include – designers, software engineers that can make the tools to make the chips, core engineering, chip engineers and design services.
The opportunities are exponential. The packages too that even freshers receive within this field are exponentially high.
Q6 – Is a degree required to work in the chip industry or can someone learn online and start in it?
To work in chip design or platform engineering you require a strong foundation of electronics. Even on the software end, an understanding of how chips work is required. This can be very difficult to learn online since it is very niche and an in depth understanding is required.
Having said that, you need to have an engineering degree to make a career in this fields.
About the Interviewees
Rtr. Shreyans Jain is part of Rotaract Club of Dahisar Coast. He is currently working at Deloitte India as a Data Scientist.
Rtr. Darsh Bijoor is part of Rotaract Club of Borivali Heights. He is currently working at Finovate Capital as Growth & Strategy Expert.
This post focuses on providing a short and simple tutorial of how to train your deep learning model on Dockers. For this tutorial we will be using NVIDIA DGX1 which has Ubuntu 18.04 OS. The tutorial can also be followed on previous versions of Ubuntu and on any NVIDIA enabled laptops or computers. This tutorial is for beginners, so if you have any advance query please leave a comment or contact me.
To know more and how to install Dockers and NVIDIA-Docker please read my other article which can be found here.
Before we move any further, I would like to make you understand my setup. That should give you probably good idea about my scenario of how I am using the commands. I am pursuing my Masters from Bennett University. We have a Supercomputer installed (NVIDIA DGX1). I have been managing it for quite while now. It can be accessed through SSH client, we just need to enter IP address and port number to access it. I generally use Putty for connecting to DGX1. And before accessing the Docker/NVIDIA-Docker I use tmux for creating sessions.
Creating New Session and Accessing it.
For creation of new session use the following command.
tmux new -s session_name
Replace the session_name with the name you want to give. When you type this, it will automatically take you to newly created session.
To exit the session just type exit while you are in session. And if you want to just come out of session without exiting the session you can press ctrl+b and then press d.
To re-enter your session, you can type the following command
tmux a -t session_name
To list all the available sessions, you can use tmux ls command.
Advantages of Using Tmux Sessions
Sessions which are created helps in retaining the record, it helps in keeping the session alive even after the computer is switched off. When the session is loaded again, all the works starts from where it was left. So here it will help us in keeping the container alive, so that we can use it for other programs as well. Use the Tmux Cheatsheet link for more details on usage of Tmux command to manage the sessions.
Pulling a Docker/NVIDIA-Docker Container for Deep Learning Models
Now once you are in tmux session, you can start a docker which can be used for training deep learning model. I generally prefer using NVIDIA-Docker for Deep Learning Models. As we already know that Docker commands are used to pull already created containers. There are few containers which contain TensorFlow, Caffe, PyTorch and whichever deep learning libraries are available. For this tutorial I will be using TensorFlow Container. Check the list of links given bellow for other containers:
First step is to pull the container from the source. To pull a container you can use the following command. The command is also used for accessing the docker container for later usages.
NV_GPU='0' nvidia-docker run --name name_of_container --rm -it -v /home/dgxuser104/:/home/dgxuser104/ tensorflow/tensorflow:latest-gpu-py3
In the above command there are many options and flags which are absolutely confusing. So I will explain every thing one by one.
NV_GPU is used to assign specific GPU to the docker. In my case we have 8 GPU which we can use, out of which I am using GPU_ID: 0 .
nvidia-docker is the main command to pull the container.
For –name option, you have to provide whatever name you prefer for the command, just replace name_of_container with the name you want to give.
When you exit docker, it still remains in the system, so you need to ensure that once your task is over them memory which is assigned to docker should be freed. To do so we use –rm option.
The next option is -it flag. When we want to train our own model we require a interactive command line environment. So, if we do not use it, we will not be able to create our files and train our model. So just use this.
The -v flag is used to mount some drive to the container, so that whatever files you want to create or use, you can pick it using this flag. In the command /home/dgxuser104/:/home/dgxuser104/ this part helps in accessing the files by the container in the specified location.
tensorflow/tensorflow:latest-gpu-py3 is the container that we are accessing. Here after the tensorflow/tensorflow means that we are downloading the TensorFlow container from TensorFlow repository, and after: is the specification of the container we want. So, here our container is a latest version of TensorFlow (that is TensorFlow v1.13.1) which is pre-configured to use GPU and have only Python3 support. To use different containers change the name of container.
When we run the command for the first time, the container is downloaded from it’s source repository. And once it is downloaded, you will get a interactive interface. Now, obviously here interactive means that you will be able to create or delete any file and use the ability of container for your advantage. Make a note that once you are in the container, you have limited root access, every file that is created is owned by root.
Training Your Deep Learning Model
To train our Deep Learning Model, we will require to write a code in Python3, as we have downloaded the container with py3. We can create our model using either Keras or TensorFlow. Note that if you have provided multiple GPU’s to Container (in NV_GPU) then the model should be Multi-GPU Model, so that it can exploit the complete capability of the GPU’s (This is optional if you have only one GPU). Follow the following steps to start training your model:
Start a Tmux Session. (See “Creating New Session and Accessing it” Section for help.)
Once you are into a session, you need to pull the container. (See “Pulling a Docker/NVIDIA-Docker Container for Deep Learning Models” section for more details.)
Install the packages which are required for the model. Some of the packages are generally preinstalled, but some of them need to be installed. Download the install.sh file (Scroll to the end of the article to find the download link). To run the .sh file you will need to follow the following steps
First change the permissions of the file by chmod 777 install.sh
Edit the file according to your usage.
Save the file and run by ./install.sh
Once you have all the supporting packages you need to create all the python files for training your model. And just run as python filename_of_model.py
Once you train all the models, you will see the saved model files. Now, we know that in container every file that is created is owned by root, so once you exit the container the files will not be accessible to you. So before you exit the container give permission to all the files created. To give the permission to file use this command – chmod 777 file1 file2 file3 ... This step is mandatory for those who do not have root permissions for their systems.
Now you have all the trained files which can be used further for your application.
Download the Install.sh file by clicking on the download button.
I hope the article helps in understanding the Dockers and Containers in more detail. If you have any query related to the article, you can make a comment with your issue or you can contact me through the contact me page.
Thank You for reading the article. If you feel the article helps you in any way, please Like, share and comment on the article. Your feedback is appreciated.
This post focuses on providing a short and simple tutorial of how to install Docker and NVIDIA-Docker on your Linux system. For this tutorial I am using NVIDIA DGX1 which has Ubuntu 18.04 OS. The tutorial can also be followed on older versions of Ubuntu. This tutorial is for sudo users only, if you do not have sudo access please contact your system’s administrator. For any other query on the following tutorial you can make a comment or contact me.
Docker & NVIDIA-Docker
Both Docker and NVIDIA-Docker are tools to create, develop, test and deploy applications using container. Container is like a module which contain all the libraries and other dependencies which are required for a particular application. So once a container is created, the whole thing can be delivered to use it directly without any other issues of installations. OS like Linux and MAC, can directly use these containers to run an application. Basically, Docker and NVIDIA-Docker acts as Virtual Machine, but without creating the whole Virtual OS. For more details, visit the corresponding links of Docker and NVIDIA-Docker.
Steps Involved
There are two steps involved from setting up of Docker and NVIDIA-Docker so that it can be used further. Check this article to see how to use Docker and NVIDIA-Docker for training Deep Learning Models.
Step 1 – Installing Docker
First update the apt index and list by running the following command and then perform the upgrade to ensure that all the packages are up-to-date:
$ sudo apt-get update
$ sudo apt-get upgrade
Once you run the above commands successfully, you need to install additional dependencies to support Docker installation.
To verify whether the installation was successful or not you can run the following command to check:
$ docker -v
The output of this command should look like this:
>> Docker version 18.09.2, build 6247962
Note: Build number could differ.
If there are multiple users who are going to access the docker then its better to remove the “sudo” requirement while running the code. To remove the requirement, add the users to docker group. To add the users in docker group just run the following command:
$ sudo usermod -aG docker Username1 Username2 ...
Now all the username that you added to the command are part of docker group. Now to access the docker from different users, they wont need to use “sudo”.
Step 2 -Installing NVIDIA-Docker
NVIDIA-Docker is a abstraction over Docker. They were created to exploit the copability of NVIDIA GPU’s. NVIDIA-Docker contains CUDA Drivers, so that Docker can access GPU/s. Whenever any application runs on NVIDIA-Docker, it uses the capability of GPU to speed up the execution of the application.
First we need to set the GPG Key and remote repositories. Run the following command to get it done:
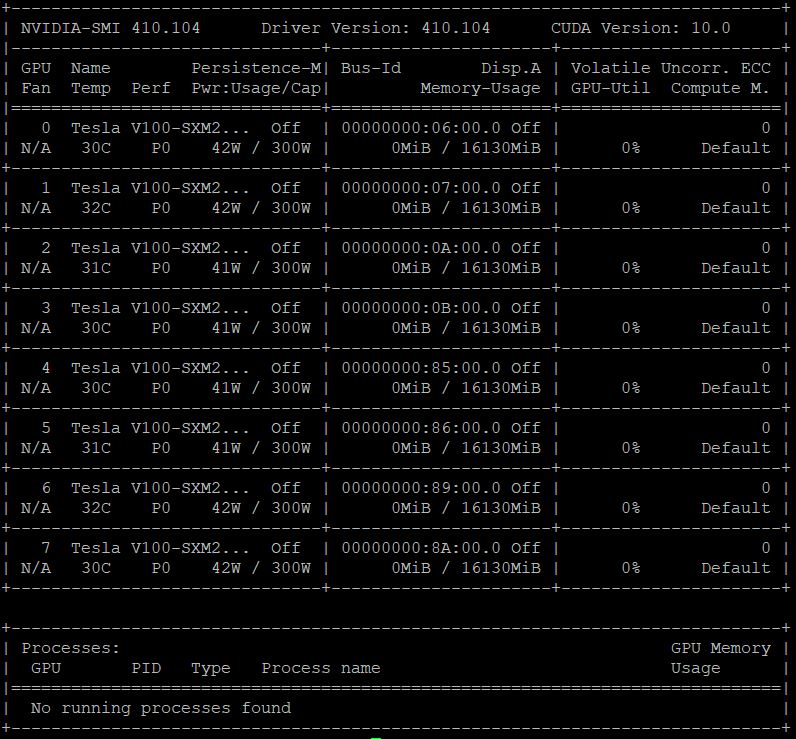
Run the following command to ensure the installation:
docker run --runtime=nvidia --rm nvidia/cuda:10.1-base nvidia-smi
The output of the above command:
Finally you will have your working Docker and NVIDIA-Docker. Now if you are wondering how you can use it then wait for my other posts which will have the detailed instructions of how you can use the Docker for Creating Containers, Development of Applications, Testing and etc.
Major Commands
Note that all the commands in this section can be used as nvidia-docker instead of docker, that is just replace docker with nvidia-docker and all the commands will work the same, but with GPU support.
There are lot of command options of Docker and lot of flags for each option. Docker commands can be intimidating but once you start using it, it will become more logical to use those flags. Out of all the options we will explore 5 commands on surface. To go through the list of command options you can type the following:
$ docker --help
The output of the above command will be a long list of options. You can get more details on each option by using the following command:
$ docker <option_name> --help
From the list of docker command options we will explore run, start, stop, ps and rm options.
Option run is used to create a new instance of docker which is available publicly on Docker Hub (Note: You need to create your Docker Hub account to access the available dockers). When you run the following command, automatically a container_idis assigned to the instance which can be used later on to manage the container.
$ docker run --name <container_name> <container>
In the above command –name flag is used to assign a name to the container, through this it becomes easier to access that container later on. There are lot of other flags available with run option to use. Read its –help, to exploit the full capability of run option.
The next option is stop option, which stops the running docker. You can pass either the container_id or container_name to it.
$ docker stop <container_name/container_id>
The next option is start. This option is used to start the stopped containers.
$ docker start <container_name/container_id>
Now to check which containers are running, you can use the following command:
$ docker ps
Use flag -a with the above command to see all the container instances running and stopped with their timestamp, name and id.
Stopping a container doesn’t removes that container instance, it just stops it. So if we want to kill any container instance, then use the following command:
$ docker rm <container_name/container_id>
By this I conclude this article. We have covered Installation of Docker, NVIDIA-Docker and we also saw briefly how to use these dockers.
My next article will be about how you can Train your Deep Learning Models using Docker. The link for the next article can be found here.

![[How To] Train Deep Learning Models on Docker/NVIDIA-Docker](https://shreyanssjain.com/wp-content/uploads/2019/04/how-to-train-deep-learning-model-on-docker-1.png?w=820)