This post focuses on providing a short and simple tutorial of how to install Docker and NVIDIA-Docker on your Linux system. For this tutorial I am using NVIDIA DGX1 which has Ubuntu 18.04 OS. The tutorial can also be followed on older versions of Ubuntu. This tutorial is for sudo users only, if you do not have sudo access please contact your system’s administrator. For any other query on the following tutorial you can make a comment or contact me.
Docker & NVIDIA-Docker
Both Docker and NVIDIA-Docker are tools to create, develop, test and deploy applications using container. Container is like a module which contain all the libraries and other dependencies which are required for a particular application. So once a container is created, the whole thing can be delivered to use it directly without any other issues of installations. OS like Linux and MAC, can directly use these containers to run an application. Basically, Docker and NVIDIA-Docker acts as Virtual Machine, but without creating the whole Virtual OS. For more details, visit the corresponding links of Docker and NVIDIA-Docker.
Steps Involved
There are two steps involved from setting up of Docker and NVIDIA-Docker so that it can be used further. Check this article to see how to use Docker and NVIDIA-Docker for training Deep Learning Models.
Step 1 – Installing Docker
First update the apt index and list by running the following command and then perform the upgrade to ensure that all the packages are up-to-date:
$ sudo apt-get update
$ sudo apt-get upgrade
Once you run the above commands successfully, you need to install additional dependencies to support Docker installation.
$ sudo apt-get install apt-transport-https ca-certificates curl software-properties-commonAdd the Docker’s official GPG Key:
$ curl -fsSL https://download.docker.com/linux/ubuntu/gpg | sudo apt-key add -Now you need to add the official repository for Docker:
$ sudo add-apt-repository "deb [arch=amd64] https://download.docker.com/linux/ubuntu $(lsb_release -cs) stable"Once the repository is added you need to update the apt index again, and then finally install the Docker Community Edition
$ sudo apt-get update && apt-get install docker-ceTo verify whether the installation was successful or not you can run the following command to check:
$ docker -vThe output of this command should look like this:
>> Docker version 18.09.2, build 6247962
Note: Build number could differ.
If there are multiple users who are going to access the docker then its better to remove the “sudo” requirement while running the code. To remove the requirement, add the users to docker group. To add the users in docker group just run the following command:
$ sudo usermod -aG docker Username1 Username2 ...Now all the username that you added to the command are part of docker group. Now to access the docker from different users, they wont need to use “sudo”.
Step 2 -Installing NVIDIA-Docker
NVIDIA-Docker is a abstraction over Docker. They were created to exploit the copability of NVIDIA GPU’s. NVIDIA-Docker contains CUDA Drivers, so that Docker can access GPU/s. Whenever any application runs on NVIDIA-Docker, it uses the capability of GPU to speed up the execution of the application.
First we need to set the GPG Key and remote repositories. Run the following command to get it done:
$ curl -s -L https://nvidia.github.io/nvidia-docker/gpgkey | sudo apt-key add -
distribution=$(. /etc/os-release;echo $ID$VERSION_ID)
curl -s -L https://nvidia.github.io/nvidia-docker/$distribution/nvidia-docker.list | sudo tee /etc/apt/sources.list.d/nvidia-docker.list
Update the apt index and install the NVIDIA-Docker
$ sudo apt-get update && apt-get install -y nvidia-docker2Now reload the docker demon configurations:
$ sudo pkill -SIGHUP dockerdNow make sure the NVIDIA GPU drivers are installed
$ sudo apt-get remove nvidia-384 ; sudo apt-get install nvidia-384Run the following command to ensure the installation:
docker run --runtime=nvidia --rm nvidia/cuda:10.1-base nvidia-smiThe output of the above command:
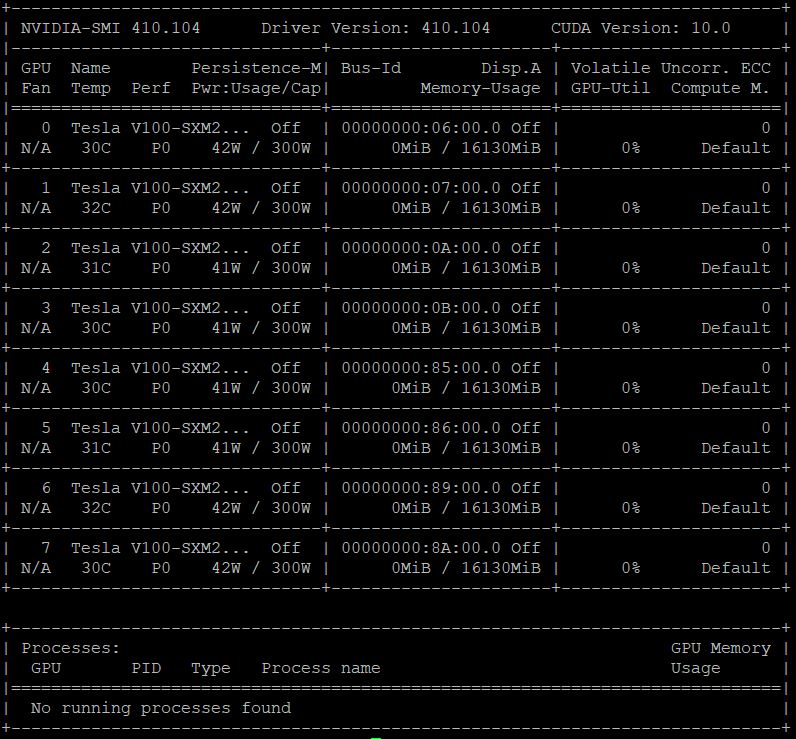
Finally you will have your working Docker and NVIDIA-Docker. Now if you are wondering how you can use it then wait for my other posts which will have the detailed instructions of how you can use the Docker for Creating Containers, Development of Applications, Testing and etc.
Major Commands
Note that all the commands in this section can be used as nvidia-docker instead of docker, that is just replace docker with nvidia-docker and all the commands will work the same, but with GPU support.
There are lot of command options of Docker and lot of flags for each option. Docker commands can be intimidating but once you start using it, it will become more logical to use those flags. Out of all the options we will explore 5 commands on surface. To go through the list of command options you can type the following:
$ docker --helpThe output of the above command will be a long list of options. You can get more details on each option by using the following command:
$ docker <option_name> --helpFrom the list of docker command options we will explore run, start, stop, ps and rm options.
Option run is used to create a new instance of docker which is available publicly on Docker Hub (Note: You need to create your Docker Hub account to access the available dockers). When you run the following command, automatically a container_id is assigned to the instance which can be used later on to manage the container.
$ docker run --name <container_name> <container>In the above command –name flag is used to assign a name to the container, through this it becomes easier to access that container later on. There are lot of other flags available with run option to use. Read its –help, to exploit the full capability of run option.
The next option is stop option, which stops the running docker. You can pass either the container_id or container_name to it.
$ docker stop <container_name/container_id>The next option is start. This option is used to start the stopped containers.
$ docker start <container_name/container_id>Now to check which containers are running, you can use the following command:
$ docker psUse flag -a with the above command to see all the container instances running and stopped with their timestamp, name and id.
Stopping a container doesn’t removes that container instance, it just stops it. So if we want to kill any container instance, then use the following command:
$ docker rm <container_name/container_id>By this I conclude this article. We have covered Installation of Docker, NVIDIA-Docker and we also saw briefly how to use these dockers.
My next article will be about how you can Train your Deep Learning Models using Docker. The link for the next article can be found here.
